
Set up your ASUS ROG gaming router for WorldNet fibre using its web interface. Compatible models: GT-AC2900, GT-AC5300, GT-AX11000, GT-AX11000 Pro, GT-AX6000, GT-AXE11000, GT-AXE16000, GS-AX3000, GS-AX5400, GT-BE96, GT-BE98, GT-BE98 Pro, GT-BE19000, GT-BE19000AI, GS-BE18000, GS-BE7200X.
Note: The screenshot shows the ROG interface example used in the GT-AX6000 manual. Extra menu items may differ; follow the named settings.
Step 1: Connect the router
1.1 Connect the ONT
Use an Ethernet cable to connect the active ONT port specified by WorldNet to your router’s WAN / Internet port. The ONT port number can vary; use the port specified for your service.
1.2 Power on the devices
Make sure the ONT and router are powered on. If you restarted the ONT, wait about 2 minutes for it to reconnect.
Note: If setup asks you to choose a WAN port, select the port connected to the ONT. Do not select a LAN or Gaming Port unless that port is explicitly configured as WAN.
Step 2: Connect your computer or phone
Choose one connection method.
Option 1: Wired connection
Connect your computer to an available LAN port on the router with an Ethernet cable.
Option 2: Wireless connection
Join the router’s Wi-Fi using the network name and password on its label. If these details have been changed, use your current Wi-Fi details.
Note: Stay connected to the router throughout setup.
Step 3: Set up the router
WorldNet Internet Settings
Internet Connection Type
Dynamic IP / DHCP / Automatic IP / IPoE
VLAN
Disabled / Off
Choose the matching option shown by your router.
3.1 Open the setup page
Enter http://www.asusrouter.com in your browser. If the login page does not open, try http://192.168.50.1 or http://192.168.1.1, or check the login address on your router label. Sign in with your administrator password. For a new router, follow the prompt to create the login details.
3.2 Choose Automatic IP
For a new router, follow Quick Internet Setup and choose Wireless router mode if prompted. Confirm Automatic IP; if it is detected automatically, continue without entering a broadband username or password.
To check or change an existing connection, open Advanced Settings > WAN > Internet Connection. Set WAN Connection Type to Automatic IP, Enable WAN to Yes and Enable NAT to Yes. Keep automatic DNS, then select Apply.
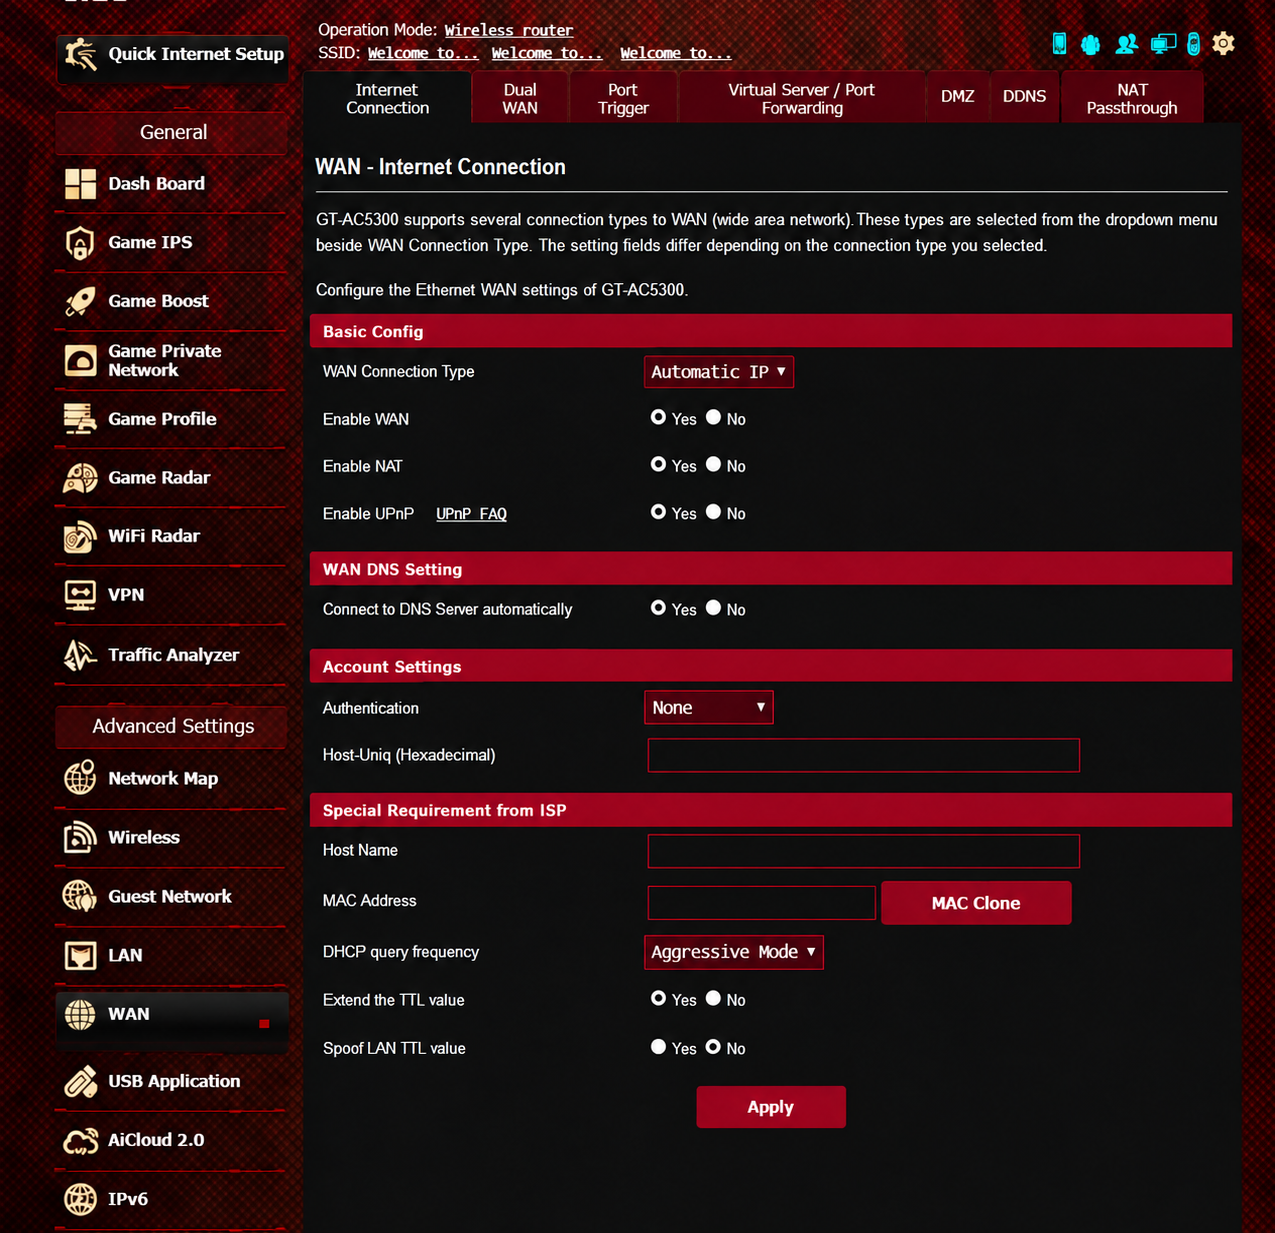
3.3 Set your Wi-Fi name and password
If you are using Quick Internet Setup, enter your preferred Wi-Fi name and a strong password when prompted. Otherwise, open Wireless > General to change them. Configure the bands shown by your router, select Apply, then reconnect using the new Wi-Fi details.
Finish any remaining setup prompts. The administrator password is separate from your Wi-Fi password.
Step 4: Test your internet connection
Open a website while connected to the router by Ethernet or Wi-Fi.
Note: When testing on a phone, temporarily turn off mobile data to confirm that the internet is coming through Wi-Fi rather than 4G/5G.