
Set up your ASUS TUF gaming router for WorldNet fibre using its web interface. Compatible models: TUF-AX3000, TUF-AX3000 V2, TUF-AX4200, TUF-AX5400, TUF-AX6000, TUF-BE3600, TUF-BE6500, TUF-BE9400.
Step 1: Connect the router
1.1 Connect the ONT
Use an Ethernet cable to connect the active ONT port specified by WorldNet to your router’s WAN / Internet port. The ONT port number can vary; use the port specified for your service.
1.2 Power on the devices
Make sure the ONT and router are powered on. If you restarted the ONT, wait about 2 minutes for it to reconnect.
Note: If setup asks you to choose a WAN port, select the port connected to the ONT. Do not select a LAN or Gaming Port unless that port is explicitly configured as WAN.
Step 2: Connect your computer or phone
Choose one connection method.
Option 1: Wired connection
Connect your computer to an available LAN port on the router with an Ethernet cable.
Option 2: Wireless connection
Join the router’s Wi-Fi using the network name and password on its label. If these details have been changed, use your current Wi-Fi details.
Note: Stay connected to the router throughout setup.
Step 3: Set up the router
WorldNet Internet Settings
Internet Connection Type
Dynamic IP / DHCP / Automatic IP / IPoE
VLAN
Disabled / Off
Choose the matching option shown by your router.
3.1 Open the setup page
Enter http://www.asusrouter.com in your browser. If the login page does not open, try http://192.168.50.1 or http://192.168.1.1, or check the login address on your router label. Sign in with your administrator password. For a new router, follow the prompt to create the login details.
3.2 Choose Automatic IP
For a new router, follow Quick Internet Setup and choose Wireless router mode if prompted. Confirm Automatic IP; if it is detected automatically, continue without entering a broadband username or password.
To check or change an existing connection, open Advanced Settings > WAN > Internet Connection. Set WAN Connection Type to Automatic IP, Enable WAN to Yes and Enable NAT to Yes. Keep automatic DNS. If Connect to DNS Server automatically is shown, select Yes; otherwise leave DNS at its ISP-provided default. Leave other fields at their defaults, scroll down and select Apply.
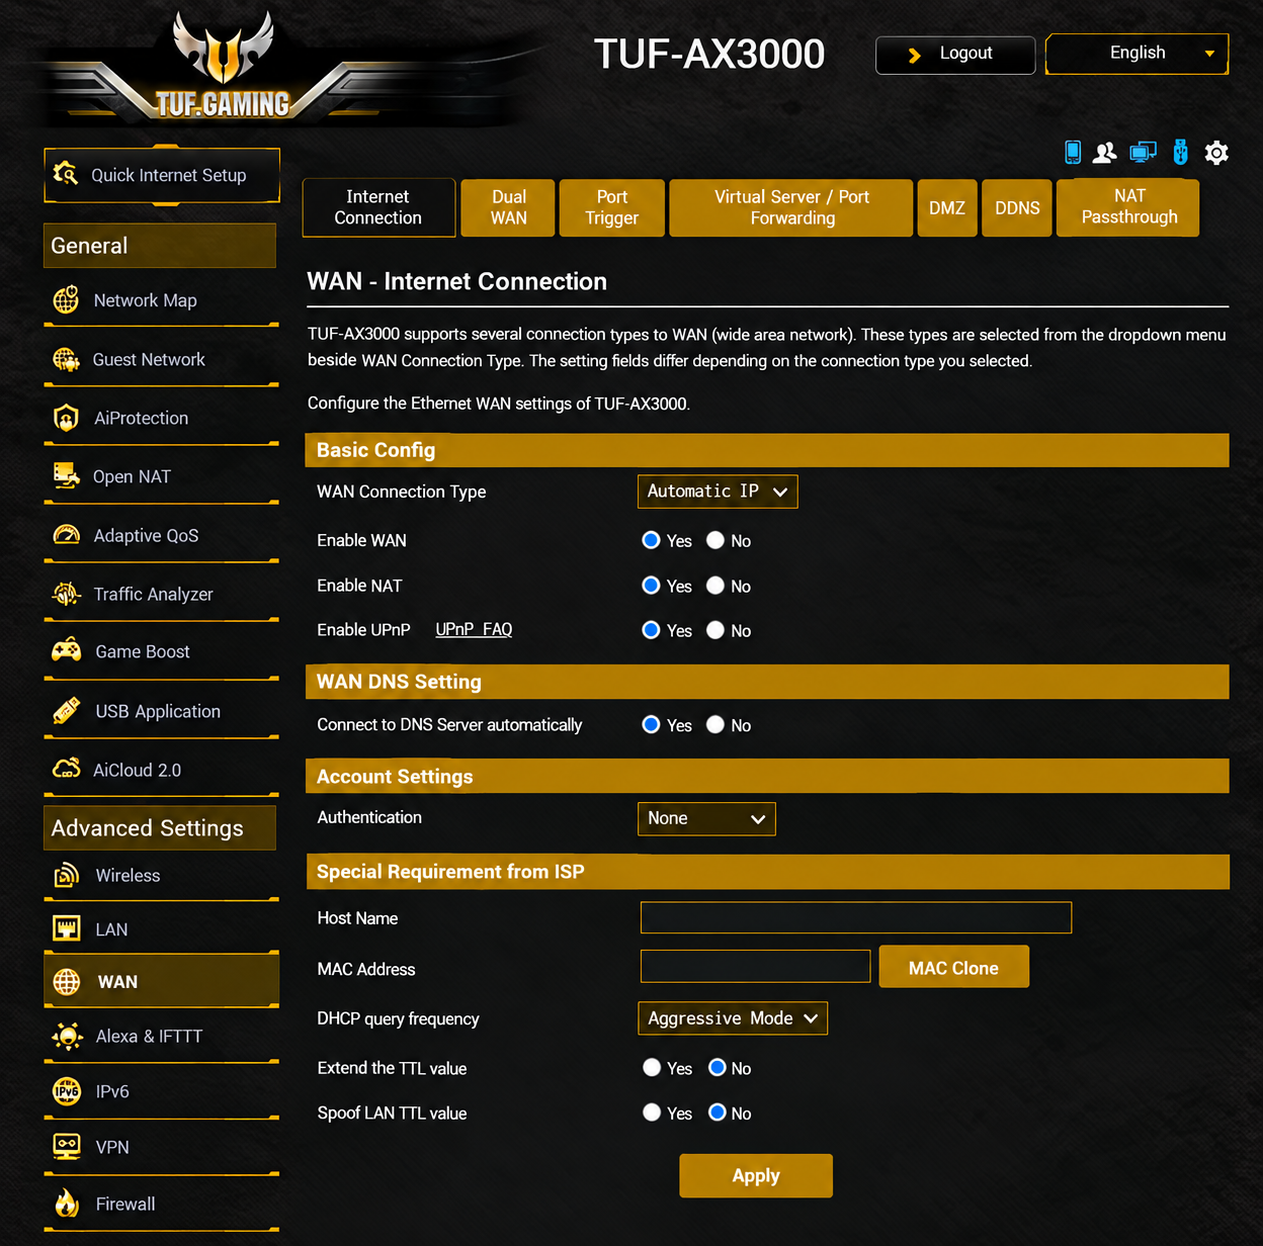
3.3 Set your Wi-Fi name and password
If you are using Quick Internet Setup, enter your preferred Wi-Fi name and a strong password when prompted. Otherwise, open Wireless > General to change them. Configure the bands shown by your router, select Apply, then reconnect using the new Wi-Fi details.
Finish any remaining setup prompts. The administrator password is separate from your Wi-Fi password.
Step 4: Test your internet connection
Open a website while connected to the router by Ethernet or Wi-Fi.
Note: When testing on a phone, temporarily turn off mobile data to confirm that the internet is coming through Wi-Fi rather than 4G/5G.